

Hello there! Are you struggling with properly sighting in your rifle scope? Don’t worry, we’ve got you covered! In our article titled “A Complete Guide to Sighting In Your Rifle Scope,” we will provide you with all the information you need to make this task a breeze.
Curious to learn more about sighting in your rifle scope? Look no further! In our comprehensive article, we will walk you through the step-by-step process of properly sighting in your rifle scope. From understanding the basic principles to deciding on the best target distance, we’ve got you covered. So grab your rifle and let’s get started on achieving that perfect sight picture! Time to take your shooting skills to the next level with our complete guide!

This image is property of cdn-aclpl.nitrocdn.com.
Understanding the Rifle Scope
A rifle scope is an essential tool for improving accuracy and precision when shooting. Whether you are a seasoned hunter or a competitive shooter, properly sighting in your rifle scope is crucial for hitting your target consistently. In this comprehensive guide, we will take you through the entire process of sighting in your rifle scope, from understanding its components and features to fine-tuning it for optimal performance.
Components and features of a rifle scope
Before we delve into the process of sighting in your rifle scope, it is important to understand its key components and features. A typical rifle scope consists of the following parts:
- Objective lens: This is the lens at the front of the scope that allows light to enter and forms the image you see through the scope.
- Ocular lens: Located at the rear of the scope, this lens is used to focus the image to your eye.
- Tube: The main body of the scope that houses the lenses and other internal components.
- Turrets: These adjustable knobs allow you to make precise adjustments for windage (horizontal) and elevation (vertical) to align the reticle with the point of impact.
- Reticle: Also known as the crosshairs, the reticle helps you aim at your target and make accurate shots.
Apart from the basic components, rifle scopes come with various features such as adjustable magnification, parallax adjustment, illuminated reticles, and more. Understanding these features will help you select the right scope for your specific firearm.
Choosing the right scope for your firearm
When selecting a rifle scope, there are a few factors to consider that will ensure compatibility and optimal performance:
- Magnification: Determine the appropriate magnification range based on your shooting needs. Higher magnification is suitable for long-range shooting, while lower magnification works well for short-range or quick target acquisition.
- Objective lens size: The diameter of the objective lens affects the amount of light transmission and the scope’s overall brightness. Larger objective lenses allow more light and are suitable for low-light conditions.
- Reticle type: Choose a reticle that suits your shooting style and environment. Popular reticle types include duplex, mil-dot, BDC (bullet drop compensating), and illuminated reticles for enhanced visibility in low-light conditions.
- Durability and quality: Opt for scopes made from high-quality materials that can withstand recoil, harsh environmental conditions, and provide clear and sharp images.
- Budget: Determine how much you are willing to spend on a scope. Remember, investing in a good quality scope will yield better results in terms of accuracy and durability.
By considering these factors, you can choose a rifle scope that suits your needs and ensures optimal performance when it comes to sighting in.
Understanding the reticle and its adjustments
The reticle is an essential component of the rifle scope, allowing you to aim accurately at your target. There are various types of reticles available, each with its own advantages.
- Duplex Reticle: This is the most common type of reticle, featuring a simple crosshair design. It offers quick target acquisition and is suitable for a wide range of shooting scenarios.
- Mil-Dot Reticle: The mil-dot reticle features dots or hash marks along the horizontal and vertical lines. It enables precise rangefinding and compensating for bullet drop and wind drift.
- BDC Reticle: The bullet drop compensating (BDC) reticle provides aiming points for different ranges, allowing you to compensate for the bullet drop without making manual adjustments.
- Illuminated Reticle: This reticle offers variable brightness settings, making it visible even in low-light conditions. It is especially useful for hunting during dawn or dusk.
To align the reticle with the point of impact, rifle scopes have windage and elevation adjustments in the form of turrets. These turrets allow you to move the reticle horizontally (windage) or vertically (elevation) to compensate for any deviations.
Preparing for Sighting In
Before you begin the process of sighting in your rifle scope, it is essential to make necessary preparations. This ensures a smooth and effective sighting in process. Consider the following steps:
Selecting the appropriate range for zeroing
You should choose a range that allows you to safely and accurately sight in your rifle. Ideally, a range with a designated area for zeroing-in is recommended. Ensure that the range is not crowded and offers a safe shooting environment. Also, verify that the range allows for the distance you plan to zero your rifle scope.
Ensuring a stable shooting platform
To achieve consistent and reliable results, it is crucial to establish a stable shooting platform. This means using a shooting bench, sandbags, or other supports to stabilize your firearm. The goal is to eliminate as much human error as possible and focus solely on the performance of the rifle and scope.
Gathering necessary equipment and ammunition
Before heading to the range, gather all the necessary equipment and ammunition you will need for the sighting in process. This includes your rifle, scope, ear and eye protection, shooting rest, and the appropriate ammunition for your specific firearm.
It is important to use the same ammunition that you plan to use for your shooting purposes to achieve the most accurate results. Different brands and types of ammunition can have variations in trajectory, which can affect the point of impact.
Once you have made these preparations, you are ready to proceed with mounting and sighting in your rifle scope.

This image is property of cdn-aclpl.nitrocdn.com.
Mounting the Scope
Mounting your rifle scope properly is vital for consistent accuracy. Improper mounting can lead to the scope shifting under recoil, affecting the zero and point of impact.
Properly attaching the scope to your firearm
Before mounting the scope, ensure that your firearm’s action is clear and unloaded. Follow these steps to mount your scope correctly:
- Select the appropriate scope rings/bases: Depending on the firearm and scope you are using, choose the appropriate rings or bases. Ensure that they match the diameter of your scope tube, and opt for high-quality rings that will securely hold the scope in place.
- Attach the base to your firearm: Following the manufacturer’s instructions, attach the base securely to your firearm using the provided screws or other mounting systems.
- Place the scope in the rings and tighten: Carefully place the scope into the rings, ensuring that it is centered and level. Tighten the ring screws gradually, alternating between screws to apply even pressure. Avoid over-tightening, as it can damage the scope tube or cause alignment issues.
- Check for proper alignment: Once the rings are tightened, visually inspect the alignment of the reticle. It should be level and centered in the scope tube. Make any necessary adjustments by loosening the ring screws slightly and repositioning the scope.
- Tighten all screws securely: After ensuring proper alignment, tighten all screws on the rings and base securely. Use a torque wrench if available to achieve the manufacturer’s recommended torque specifications.
By following these steps, you can ensure that your scope is securely mounted and aligned with your firearm.
Adjusting eye relief and ensuring proper alignment
After mounting the scope, you need to adjust the eye relief and ensure that the scope is properly aligned with your eye. Eye relief refers to the distance between your eye and the ocular lens of the scope. This adjustment is essential to obtain a clear and full field of view through the scope.
Follow these steps to adjust the eye relief and align the scope with your eye:
- Position your eye: Assume your shooting position and place your eye at the correct distance from the ocular lens. Typically, this is around 3 to 4 inches away from the scope.
- Adjust the scope position: Keeping your eye in the correct position, carefully move the scope forward or backward within the rings to achieve the desired eye relief. This adjustment ensures that you can see the full field of view without any black circles or vignetting.
- Check for proper alignment: While maintaining the correct eye relief, ensure that the scope is aligned with your eye. Look through the scope and check if the reticle appears centered and crisp. If necessary, make slight adjustments to the scope position to achieve optimal alignment.
By adjusting the eye relief and ensuring proper alignment, you can set yourself up for comfortable and accurate shooting.
Initial Bore Sight
The initial bore sighting process is crucial for aligning your scope with the bore of your firearm. While it won’t zero your rifle at this point, it significantly reduces the number of adjustments you will need to make during later stages of sighting in.
Using a bore sight tool to align the scope
A bore sight tool aligns the crosshairs of your scope with the bore of your firearm, acting as a starting point for the sighting in process.
Follow these steps to perform an initial bore sight:
- Securely set up your firearm: Place your firearm in a stable shooting rest or vise to keep it secure during the bore sighting process.
- Choose a suitable bore sight tool: There are various types of bore sight tools available, such as laser boresighters or magnetic boresighters. Select the appropriate tool for your firearm and scope.
- Insert the bore sight tool: Carefully insert the bore sight tool into the muzzle of your firearm, ensuring it is securely seated in the bore.
- Look through the scope: While keeping the firearm still, look through the scope and adjust the windage and elevation turrets to align the reticle with the bore sight tool. Make these adjustments without moving the firearm, using only the scope’s turrets.
- Verify alignment: After making the adjustments, confirm that the reticle aligns with the bore sight tool in the center of the target. While the alignment may not be perfect at this stage, it should reduce the later adjustments required significantly.
By following these steps, you can achieve an initial alignment between your scope and the bore, providing a starting point for the next stages of sighting in.

This image is property of opticsmag.com.
Zeroing at Close Range
Once you have completed the initial bore sighting, it’s time to move on to zeroing your rifle scope. Zeroing refers to aligning the point of impact (where the bullet hits the target) with the reticle.
Choosing a designated target at a close distance
Start the zeroing process by choosing a designated target at a close distance. A target about 25 yards or meters away is ideal for this stage.
Follow these steps to zero your rifle scope at close range:
- Assume a stable shooting position: Set up your shooting rest or stabilize your firearm to ensure a stable shooting platform.
- Aim at the target: Look through the scope, align the reticle with the center of the target, and take a shot. Be sure to use the same shooting fundamentals you would employ in any other shooting scenario.
- Observe the point of impact: After firing a shot, observe where the bullet hits the target in relation to the reticle. If the point of impact is to the right of the reticle, you will need to adjust the windage. If it is below the reticle, you will need to adjust the elevation.
Making adjustments to align the point of impact with the reticle
To correct the point of impact, use the windage and elevation turrets on your scope. These adjustments move the reticle incrementally in the desired direction to align the point of impact with the reticle.
Follow these steps to make the necessary adjustments:
- Windage adjustment: Turn the windage turret in the appropriate direction indicated by the markings (usually indicated by an “L” for left or an “R” for right). Make small adjustments by turning the turret in the required direction.
- Elevation adjustment: Similarly, turn the elevation turret in the appropriate direction indicated by the markings (usually indicated by an “U” for up or a “D” for down). Make small adjustments by turning the turret in the required direction.
- Re-aim and fire: After making the initial adjustments, re-aim at the center of the target, taking care to maintain a stable shooting position. Fire another shot and observe the point of impact.
- Repeat the process: If the point of impact is still not aligned with the reticle, make additional adjustments. Continue this process until the bullet consistently impacts the target at the desired point relative to the reticle.
By following this zeroing process at close range, you can align your rifle scope for accurate shooting and effectively progress to the next stage.
Confirming at Medium Range
Once you have successfully zeroed your rifle scope at close range, it is important to confirm the zero at a slightly longer distance to ensure consistency and accuracy.
Moving to a medium-range target to verify zero
Choose a target at a medium range, approximately 100 yards or meters away, to verify your zero. This distance provides a better representation of the rifle’s capabilities and helps fine-tune your adjustments.
Follow these steps to confirm your zero at medium range:
- Prepare for shooting: Establish a stable shooting position, ensuring that you are comfortable and stable on the shooting rest or other support.
- Aim at the target: Look through the scope, align the reticle with the center of the target, and take a shot. Pay close attention to your shooting fundamentals to minimize human error.
- Observe the point of impact and reticle: After firing a shot, observe where the bullet hits the target in relation to the reticle. If the bullet consistently impacts the target at the desired point relative to the reticle, your zero is confirmed. If adjustments are still needed, proceed to the next step.
Fine-tuning adjustments for accuracy and consistency
To fine-tune your zero at medium range, make small adjustments to the windage and elevation as necessary. Use the same process described earlier, making incremental adjustments to align the point of impact with the reticle.
After each shot, carefully observe and analyze the bullet’s point of impact in relation to the reticle. Remember to maintain a stable shooting position and shoot consistently to eliminate human error.
Continue this iterative process until the bullet consistently impacts the target at the desired point relative to the reticle. Take your time and be patient, as achieving an accurate zero is essential for consistent shooting performance.

This image is property of accurateshooter.net.
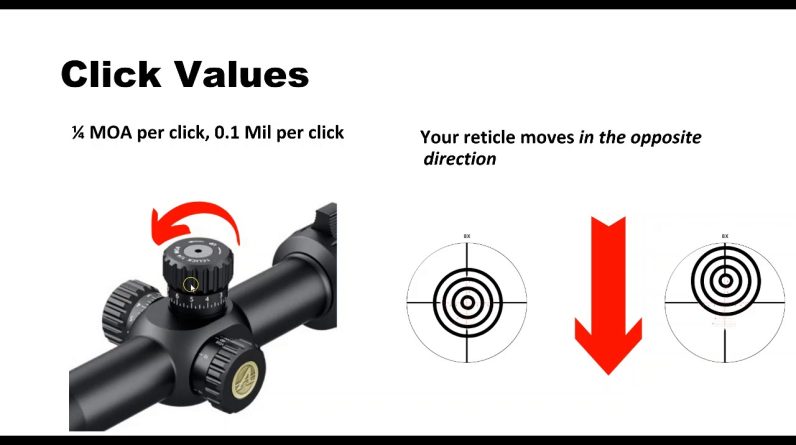
Adjusting for Windage and Elevation
Windage and elevation adjustments are crucial for compensating for bullet drop and wind drift. Understanding these adjustments allows you to make precise corrections and ensure accuracy at varying distances.
Understanding windage and elevation adjustments
Windage is the horizontal adjustment for compensating for the left or right movement of the bullet due to wind. Elevation is the vertical adjustment for compensating for bullet drop over distance.
To make windage and elevation adjustments:
- Windage: Adjust the windage turret to move the reticle left or right, aligning it with the point of impact. Each click on the windage turret typically corresponds to a measured distance (usually expressed in MOA or minutes of angle) at a specific range.
- Elevation: Adjust the elevation turret to move the reticle up or down, compensating for bullet drop. Each click on the elevation turret corresponds to a measured distance (usually expressed in MOA or minutes of angle) at a specific range.
Understanding the impact adjustments for windage and elevation allows you to compensate for environmental factors and improve shooting accuracy.
Compensating for bullet drop and wind drift
Different ammunition types and ballistic trajectories require specific adjustments to compensate for bullet drop and wind drift. Understanding your rifle’s specific ballistics data and the environmental factors will enable you to dial in the necessary windage and elevation adjustments.
Refer to ballistics charts provided by ammunition manufacturers or use ballistic calculators to determine the amount of windage and elevation adjustments required for specific distances and environmental conditions. Make these adjustments using the windage and elevation turrets on your scope.
Keep in mind that determining the appropriate windage and elevation adjustments may require some trial and error. Factors such as wind speed, direction, and distance all affect bullet trajectory. Regular practice and experimentation with different conditions will help you gauge the necessary adjustments accurately.
Sighting In for Specific Distances
Once you have established a reliable zero at a designated distance, it is crucial to adjust your rifle scope for specific shooting distances. Different shooting scenarios and trajectories require adjustments to maintain accuracy and consistency.
Adjusting for different shooting distances and trajectories
To adjust for different shooting distances, consult your rifle’s ballistics data or use a ballistic calculator to determine the appropriate adjustments. Make incremental changes to the windage and elevation turrets to account for the bullet’s trajectory at each specific distance.
Keep in mind that adjustments for elevation become more significant as the distance increases. Familiarize yourself with the bullet’s trajectory and the adjustments required for distances beyond your zero to ensure accurate shooting.
Accounting for environmental factors and ballistic data
Environmental factors such as temperature, altitude, humidity, and barometric pressure can influence the bullet’s trajectory. These factors are often provided in ballistics charts or calculators to help you make accurate adjustments.
Law enforcement, military, and competitive shooters often create custom ballistic charts or load data for their specific rifles and ammunition. By collecting data during range sessions and keeping detailed records, you can create a personalized data set that helps you make precise adjustments for specific distances and environmental conditions.

This image is property of i.ytimg.com.
Troubleshooting and Fine-Tuning
Throughout the sighting in process, it is essential to identify and address any issues or inconsistencies that may arise. Here are some common issues you may encounter and their potential solutions:
Identifying common issues and their solutions
- Inconsistent grouping: If you notice inconsistent groups while shooting at the target, it may indicate an unstable shooting platform or shooter error. Double-check your shooting position, grip, and trigger control, and ensure that your rest is stable. Eliminate any sources of human error before making further adjustments to the scope or firearm.
- Scope shifting under recoil: If you experience scope movement or shifting after firing shots, it could indicate improper mounting or insufficient scope rings. Check the tightness of all screws and, if necessary, remount the scope, making sure to follow proper mounting procedures.
- Parallax error: Parallax occurs when the reticle appears to shift relative to the target, causing a loss of accuracy. Many scopes come with a parallax adjustment feature, usually located on the side of the scope. Adjusting this feature will help eliminate parallax error and improve accuracy.
In addition to these common issues, there may be other factors specific to your firearm, ammunition, or shooting technique that require troubleshooting. Regular practice and attention to detail will help you fine-tune your rifle scope for optimal performance.
Fine-tuning the rifle scope for optimal performance
To achieve optimal performance with your rifle scope, continue to practice and refine your shooting skills. Regularly shoot at varying distances and environmental conditions to familiarize yourself with how your rifle and scope perform in different scenarios.
Pay attention to the feedback you receive from each shot and make any necessary adjustments to suit your shooting preferences. Over time, you will develop the necessary skills and knowledge to make precision shots consistently.
Conclusion
Sighting in your rifle scope is a crucial process that allows you to achieve accurate and consistent shooting results. By understanding the components and features of a rifle scope, selecting the right scope for your firearm, and following the step-by-step process outlined in this guide, you can effectively sight in your rifle scope.
Remember to approach the process with patience, attention to detail, and a commitment to practice. Regularly fine-tune your adjustments, account for environmental factors, and keep comprehensive records to optimize your shooting performance.
By following this complete guide to sighting in your rifle scope, you can improve your shooting accuracy, boost your confidence in the field or on the range, and enhance your overall shooting experience. Happy shooting!